About Me

My photo
Early childhood education has been my life for over 40 years. I have taught all age groups from infants to 5-year-olds. I was a director for five years in the 1980s, but I returned to the classroom 22 years ago. My passion is watching the ways children explore and discover their world. In the classroom, everything starts with the reciprocal relationships between adults and children and between the children themselves. With that in mind, I plan and set up activities. But that is just the beginning. What actually happens is a flow that includes my efforts to invite, respond and support children's interface with those activities and with others in the room. Oh yeh, and along the way, the children change the activities to suit their own inventiveness and creativity. Now the processes become reciprocal with the children doing the inviting, responding and supporting. Young children are the best learners and teachers. I am truly fortunate to be a part of their journey.

Saturday, November 30, 2013

TALL CARDBOARD TUBES AND ROPES

Back in June of 2011, Juliet from Creative Star Learning in Scotland, wrote a piece about using real ropes in a post she called: A rope trail for everyone.  That post got me thinking that I would like to figure out a way to use ropes at the sensory table.  After mulling it over for more than two years, I finally figured out how to incorporate ropes at the sensory table.  I built an apparatus I call: Tall Cardboard Tubes and Ropes.  (The tall cardboard tubes are analogous to the trees in Juliet's post. Is that analogy too big of a stretch?)
The tall tubes are taped at the bottom to each leg at the corners of the table.  They are taped so the lip of the table provides stability across the width of the table.   1x2 inch boards are taped to the top of the tubes to give them stability across the length of the table.  Holes of different sizes and orientations were drilled before taping the tubes to the table.

Openings were cut in the bottom of each tube because I knew children would pour and put things in the holes.  To catch the stuff, I placed planter dishes under each tube.

I really expected the children to weave the ropes in and out of the holes. But there was not much of that.  I would not say I was disappointed, just surprised.

Instead, there was a lot of activity centered around pouring pellets in the holes.  First, there were the holes in the sides of the tubes.  Have you ever tried to pour something into a hole on a vertical plane?  It is not so easy because you cannot tip your cup high enough without loosing contact with the hole.


Of course, if you can find the right implement, you can pour all the pellets down the hole.


Second, there are the holes on the very top of the tubes that create a challenge the children cannot resist.

Reaching and Pouring from Thomas Bedard on Vimeo.

What is so great about this video is that the boy has to reach up as high as he can while standing on a stool all the time keeping his noodle scoop perpendicular to the tube until he can turn his wrist to pour the pellets into the top of the tube.  Did you see his expression upon completing his self-appointed task?  The smile is priceless.

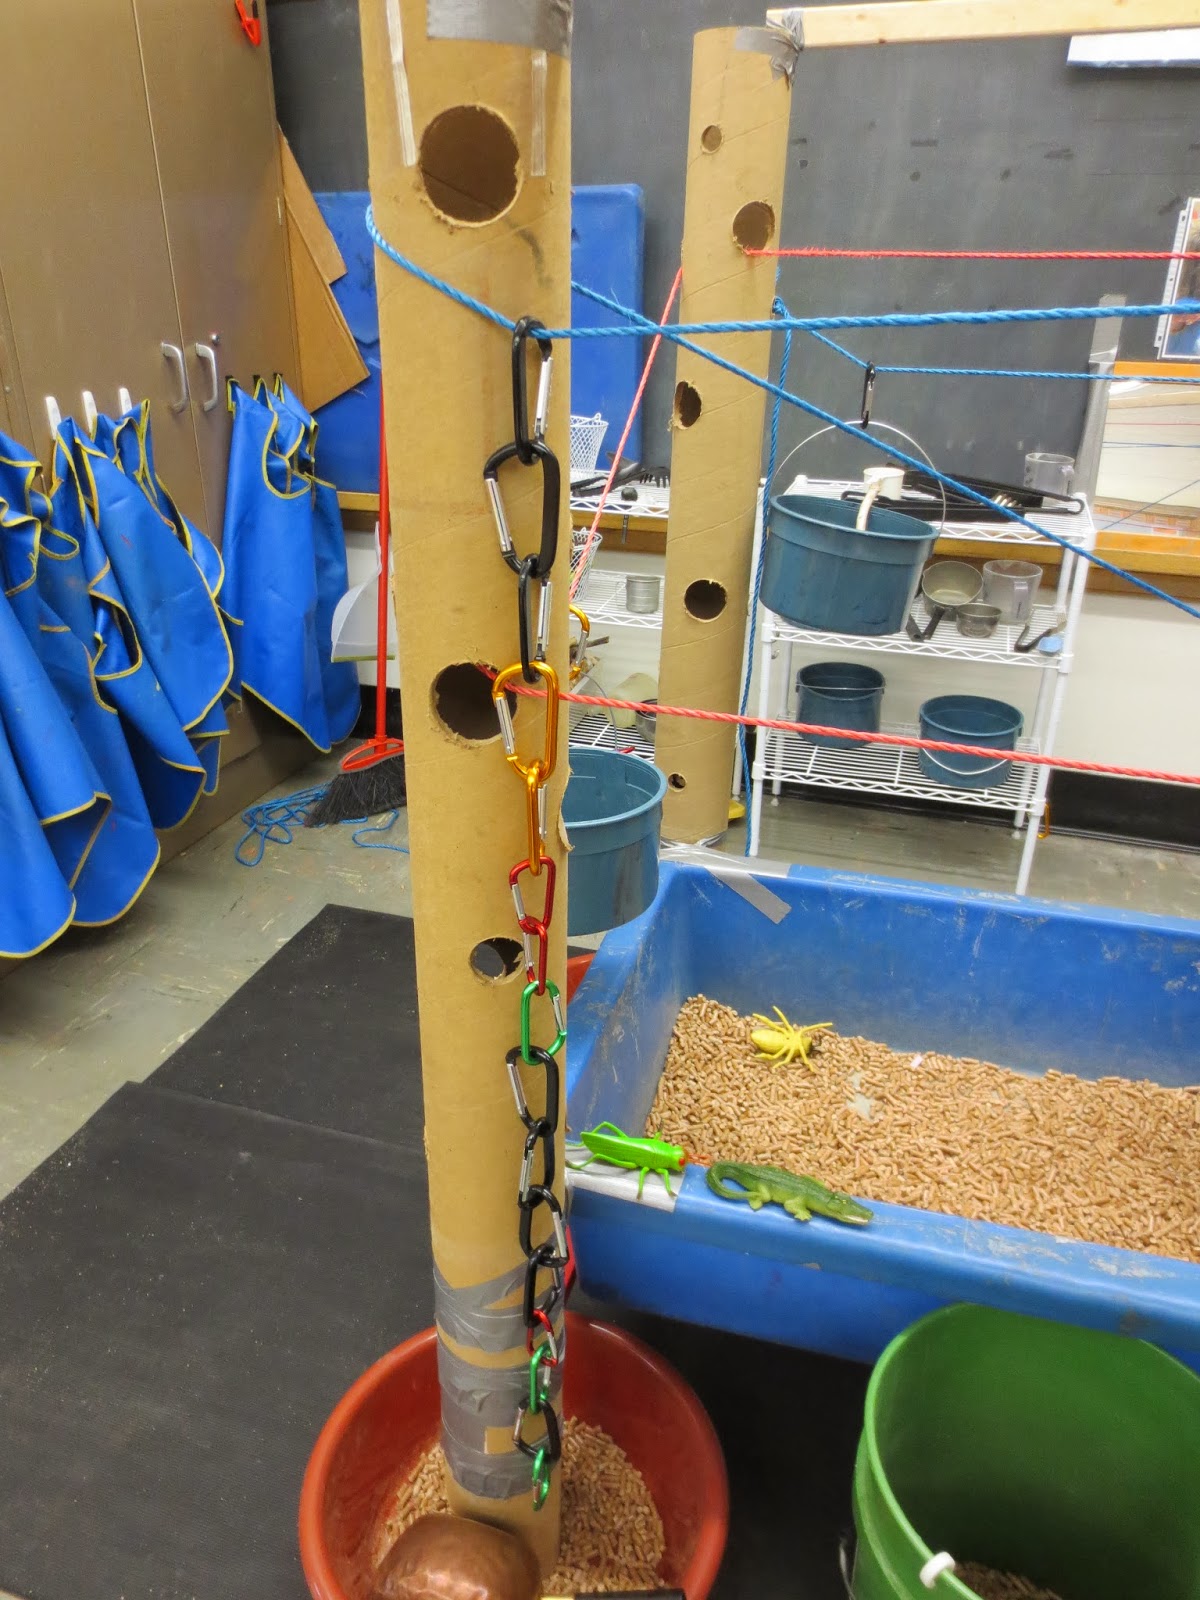
Some of the most unique play was a direct result of the provisions offered with this apparatus. There were small pails, carabiners, and S-hooks.  Below you can see all three being used: a carabiner is clamped onto to the rope; an S-hook is hitched to the carabiner, and the handle of the pail is linked into the S-hook.
When the pail is attached this way, it hangs above the table and swings back and forth.

One child hooked several carabiners together and attached a pail to the lowest carabiner.  He proudly told everyone around him that it was a campfire.

In addition to the apparatus, the children took full advantage of the carabiners as unique manipulatives.
(Please note that these are not climbing grade carabiners.  Rather, they are tagged as D-clips in the hardware store where I found them.)

The S-hooks were also used as a new manipulative.


This girl makes linking the S-hooks look easy.  That is because she does it carefully and with great precision to make sure the original links are not broken.

This apparatus fostered many unique types of exploration and play that I will write about over the next couple of weeks.  In the meantime, I want to thank Juliet at Creative Star Learning for her original inspiration.


Saturday, November 23, 2013

COMBINING APPARATUS

I want to thank all those who attended my presentation this morning at the  National Association for the Education of Young Children(NAEYC) Annual Conference in Washington D.C.  It was an 8:00 AM session and I found out there are a lot of early risers in the field of early childhood.  If you are visiting the blog for the first time, welcome.  Know that questions and comments are always welcome. If you want to email me directly, just click on the complete profile button and push email.  

Because it takes me a long time to do an original post, I am looking over previous posts and I am reposting some that may have gotten less attention than others. This fourth repost goes all the way back to December 2010.  For me this was an important early post because it showed that by combining apparatus, there is no limit as to what a person can build at the sensory table.


Wednesday, December 29, 2010

COMBINING APPARATUS: CARDBOARD DIVIDER AND TUBES

Combining apparatus allows one to exponentially vary the configuration of any given apparatus. That is especially true if you keep in mind all the dimensions mentioned in the right-hand column of this blog.  Here you see a cardboard tube embedded in a cardboard divider.


Note that this is another version of the cardboard dividers, one in which the panels are much lower.

A hole is cut in two of the panels on one side. The cardboard tube is threaded through the holes and taped. A section of the tube in the middle has been cut away.   Now besides the open spaces created by the vertical walls of the divider, the tube creates both horizontal and closed dimensions to the apparatus. 


In another version of this combined apparatus, an additional plastic florescent light cover is embedded in the divider.  This configuration is a little different because the table is used to support one end of the tube and channel and both the tube and channel extend over the end of the table so children can push the sand out of the tube and channel into the tub below.


Little construction vehicles are added because they fit nicely into the tube and channel and create a different type of play with moving the sand with front loaders and bulldozers.  

If you look at dimensions to the right again, the cardboard divider is an open apparatus with vertical walls.  The tube in the apparatus introduces a horizontal and closed dimension and the plastic channel adds an horizontal and open dimension.

What does that mean for play?

It offers opportunities for focused play in an individual space on a different level with a different dimension.  The child below is playing with the truck and bulldozer on a level six inches above the bottom of the table. In addition, he is operating on a horizontal open plane.  That naturally restricts his motor movements on that plane.
The child below is scooping sand with her hand from the tube.  This is a horizontal plane that adds a closed dimension to the apparatus.  How far can she move her hand when she scoops the sand?  And how far into the tube can she reach to scoop the sand?  She, too, can operate on two different physical levels. Actually, there is a third level with the tube when you see the tube as two separate levels: in the tube and on the tube. Both the channel and the tube offer motor experiences on a horizontal plane.  The tube also offers motor experiences that are altered by the open/closed nature of the tube.

If also offers new challenges for transporting the sand both through the window and through the tube.


It also offers new opportunities for social interaction.


And it offers new opportunities for role play.

Children will explore all the spaces you give them.  Their explorations lay the groundwork for their firsthand knowledge of spatial relations.  It almost sounds like math!


Saturday, November 16, 2013

BIG BOX

I am in the process of finalizing my presentation on sand and water tables for the National Association for the Education of Young Children(NAEYC) Annual Conference next week in Washington D.C.  Because it takes me a long time to do an original post, I am looking over previous posts and am reposting some that may have gotten less attention than others. This third repost was from September two years ago, although the actual apparatus was built more than five years ago.  I like big boxes and I like to figure out ways to attach them to the sensory table.  This particular version created two very different spaces at the table and allowed me to talk about the spaces and how children dialogued with those spaces.

Thursday, September 22, 2011


BIG BOX

A big box by itself always offers hours of fun for young children.  When I come across a big box, I like to bring it into school and attach it to the sensory table.  A few years ago, we bought a big TV.   It was not a flat screen, so it came in a big box.  So what did I do? I brought the box to school and attached it to the sensory table.

I attached it by cutting a rectangular flap on the side of the box adjacent to the table.  The top and two sides of the flap were completely cut through, but I only scored the bottom so I could fold it over and tape it to the lip of the table.  Since the lip was two inches wide, I actually scored it twice, once at the box and once where I wanted the flap to bend over the lip.

The reason it is taped is to keep it attached to the table so the children do not pull it away from the table. The hole is suppose to be a connection between the box and the table.

In addition, I cut big holes on three sides of the box not facing the table.
(If you look inside the box, you can see that all the loose flaps are taped down.  That gives the box a little extra strength and does not allow the medium to get under the inside flaps.)

This apparatus creates two separate spaces.  The spaces are very different.  The space in and around the table itself is very open and bright.  The space created by the box is closed with less light.  They are, however, connected by a window that I thought would create action between the two spaces.

This apparatus was set up in my classroom over three years ago.  I thought the window would connect play, but as I look over my documentation, I do not have any pictures of the window as a catalyst for play between the two spaces.  Neither do I have a recollection of much exploration through the window.  As you can see in the picture below, two children are playing in the two different spaces totally oblivious to each other.

Maybe the window was too small or maybe the spaces were insular enough that there was litlle play between them.  I have attached other big boxes to the sensory table and cut a larger hole between the box and the table that has resulted in much more interaction between the two spaces. Here a big box setup that fostered play between the box and the table.

Both spaces for this apparatus, though, were attractive for the the children.

Some played in the table.

Some played in the box.

Because I used farm animals and animal bedding, much of the play was similar.  There was a lot of scooping of bedding into the containers, putting the animals in the containers, and feeding the animals.

At the table


And in the box


Though the play was similar, I think the experience of space was different.  Children get a different sense of space when they are standing at the table than when they are kneeling on the floor and putting their hands, arms, head, and torso into the box.  An apparatus like this is teaching children about space because they experience space with their bodies.  And learning about space is fundamental to later academics subjects such as geometry.

Speaking of space, you cannot forget about the space on top of the box.  In the picture below, you can see a child sweeping animal bedding from the top of the box.

This picture actually shows all the different levels and spaces being used at one time in and around the table and apparatus: two girls are sweeping the floor (lowest level, flat/open space); two boys are in the box (a little higher lever, three-dimensional/closed space); one girl is playing in the table (the next highest level, three-dimensional/open space); and one boy is sweeping the top of the box(highest level, flat/open space).

Children naturally explore levels and spaces.  The more you provide, the more they will explore and discover.   


P.S.  If you are going to the NAEYC national conference in Washington DC in next week, I am presenting on sand and water tables.  The session is on Saturday morning from 8:00-9:30, so we will see who are the early birds.   In the process of preparing for the conference, I am putting together a three-ring binder of some of the apparatus that do not fit into the presentation, including some of the newest apparatus.  Any readers of the blog who want to see more examples that do not fit in the presentation, contact me to find a time to meet and chat.  Please contact me through my email: tpbedard@msn.com

Saturday, November 9, 2013

CARDBOARD CHUTES-CLOSED EDITION


Thursday, January 20, 2011


CARDBOARD CHUTES - CLOSED VERSION

I am in the process of finalizing my presentation for the National Association of Young Children Annual Conference for the third week in November.  Because it takes me a long time to finish an original post, I am looking over previous posts and will repost some that may have gotten less attention than others since I began writing over three years ago.  This second repost is from January 2011 and features an apparatus that I have since forgotten about.  Since finding it anew, I will reconstruct it sometime this school year because of the types of play and exploration it fosters. This post also covers more in-depth the building process.

If you look at the DIMENSIONS in the right-hand column of this blog, the first Cardboard Chute apparatus falls under the dimensions of incline and open.  The cardboard chutes in this post are also on an incline, but closed.  Since this actually takes some putting together, this post talks about building the apparatus.  The next post will talk about types of play and exploration fostered by this apparatus.
For this apparatus, I used three boxes.  The first box---the support box---was approximately the width of the table on one of its sides.  It was also both narrow and tall on its other two sides. Since it was the width of the table and fit snugly inside the table, it was easy to tape securely into the table.  The narrowness made it possible for the chutes to pass through it.  The height allowed the chutes to be set on an incline.  Two other boxes constituted the chutes.   One of the chutes in the picture above is a box that held window blinds and the second chute is a box that held an artificial Christmas tree.  I cut out both ends of each box.  Without those ends, the chutes collapse easily.   When they are embedded in the support box, though, they are quite stable.

Here are three boxes I used to make closed chutes three years ago.

In this version, the support box is as wide as the table and actually sits on the lip of the table.  A cardboard tube has been added so the flow of material can go two ways.  With the chutes only going one direction, the play and exploration sometimes stops when most of the material has been emptied from the table.   


To make the holes for the chutes, I first trace an end of the "chute" box onto the support box near what will be the top.


If I were just to cut the square, though, the chute would end up to be horizontal, not on an incline, in the support box.


I don't want that, so I add an inch or two to the original trace on the top to be able to orient the chute on a slant.


Two inches is a lot to add to the original trace. The more you add, the steeper the slant. (This almost sounds like a geometry lesson for a teacher.) 

By the way, I hardly ever measure. Once I have done one side, I move to the other side.  I trace the chute on the other side; I usually place the top of the trace on the second side about where the bottom of the trace is on the first side.  I then add an inch or two to the bottom.

When the holes are cut, I insert the chutes through both holes.


After inserting the chutes, I tape all around them with duct tape to keep them from sliding up or down in the support box.  If I have cut the hole a little too big for the chute, the taping covers up extra spaces. Taping is another process for which I do not measure.  I like to use duct tape that tears easily.  I will tear off a piece that is longer than the juncture I want to tape.  I use my fingers to push it into place.


Once the tape is pressed in place, I cut any extra that is hanging past the corner.  One section is pressed flat against the box and the other is folded over and down.   


When I have taped all the chutes in place, I tape the apparatus to the table.  I orient it so the higher end of the chute is above the table and the lower end extends over the table and directs the material into a tub on the floor next to the table.

OK kids, it is now yours to explore!


If you are counting, there are eight children around this table playing on several different levels afforded by the apparatus.


P.S.  If you are going to the NAEYC national conference in Washington DC in November, I am presenting on sand and water tables.  The session is on Saturday morning from 8:00-9:30, so we will see who are the early birds.   In the process of preparing for the conference, I am putting together a three-ring binder of some of the apparatus that do not fit into the presentation, including some of the newest apparatus.  Any readers of the blog who want to chat and see some examples that do not fit into the presentation, I would love to find a time to meet.  Please contact me through my email: tpbedard@msn.com

Saturday, November 2, 2013

PROFILE PICTURE


I am in the process of finalizing my presentation for the National Association of Young Children Annual Conference for the third week in November.  Because it takes me a long time to finish an original post, I am looking over previous posts and will repost some that may have gotten less attention than others since I began writing over three years ago.  This first repost speaks to what I think is the foundation of all that happens in the classroom.   That foundation is building relationships.   If we take the time to notice the children for who they are---not for what they do or can do---the relationship building process happens at a deep level because we---and especially children---are hardwired to look for and develop mutually respectful relationships.


I would like to explain the picture I chose for my profile.  The picture does not speak directly to sand and water tables, but rather my view of children.  That in turn, influences my practice which includes building apparatus for the sensory table.


This picture was taken in 2008 in a park in Los Banos, Peru.  Los Banos is famous in Peru for the thermal baths used by the Incas and is next to the city of Cajamarca in the Northern Highlands of Peru.  My daughter was living and working there at the time, so I went to visit her.  My daughter worked for DiscoverHope, a non-profit organization that gives mircroloans to women.  This particular day I had gone along with my daughter as she met with some of the women.  As she was talking with one of the women in the park, I noticed the woman's two children playing.  Before long, they were bringing me flowers.

What story does this picture tell?

It began when the children noticed that I was watching them.  Children are always looking to make connections and form relationships.  They reciprocated immediately.  It was then my turn to reciprocate.  (By the way, often times it works in reverse: a child will initiate and I will reciprocate.)   Notice two things in the picture.  First, I am down on their level.  To truly understand a child's perspective, you have to be able to get down on her level.  A colleague once related a story of a little girl who kept telling the teacher to look at the bunny in the snow.  The teacher could not see it no matter how hard she looked.  The child was insistent and finally the teacher got down on the child's level.  It was only then she saw what the child saw: the snow had drifted into the shape of a rabbit.   Second, we are focused on each other.  Our actions are our shared language even without words.  This is doubly true in this instance because my Spanish was only a few words more than their English, which was nonexistent.  There was no script to our interactions, so we made it up as we went along.   We were living in the moment: both sides initiating and responding; both sides reading each other's cues.

When I build an apparatus for the sensory table, I am using it as a provocation to begin a mutual dialogue with the children.  For any given apparatus, there are no scripted directions to follow.  Children bring their own set of abilities, interests and ideas to the table---literally. When those things are noticed and recognized in the context of our interaction, we build a respectful relationship in which we are learning from and teaching each other.

One last point about what the picture says to me.  The act of giving flowers is an excellent metaphor for the beauty all children have to offer if we are primed to notice their cues, prepared to receive them, and ready to reciprocate in kind.


P.S.  If you are going to the NAEYC national conference in Washington DC in November, I am presenting on sand and water tables.  The session is on Saturday morning from 8:00-9:30, so we will see who are the early birds.   Any readers of the blog who want to chat, I would love to find a time to meet.  Please contact me through my email: tpbedard@msn.com