Please allow me to digress from the usual post featuring an apparatus at the sensory table. Rather, I would like to show you a 7-second video that highlights axiom # 7 on the right: Children will always find activities that are tangental to the apparatus itself. Not only does it highlight the axiom, but leads to an unexpected revelation. As you watch the video, ask yourself: What is the child doing? And ask yourself: "Why is he doing what he is doing? Here goes.
First of all, you need to know that I do not generally let children take pellets from the sensory table and put them on the floor. Children naturally spill and often feel a need to transport the medium from one place to another. That is a huge reason why I build apparatuses in the first place. That is also the reason I always have a bucket next to the table so I can encourage the children who need to transport to "put it in the bucket."
So why did I just watch this two-year-old make a pile of pellets on the floor? The reason is simple---and not so simple. The main reason I let this child put the pellets on the floor is because he seemed so intentional. That is the simple part. The not so simple part has to do with making a split-second decision to not stop it, but to see where it leads. That is the part that is not so simple because knowing when to curtail a behavior is both child and context specific.
What was this boy doing? To tell you the truth, I did not really know. As he walks away, he places the cup on the floor and, after he turns, he tosses the scoop down on the floor. What did he do next? He went to get a small dust pan with a broom that is always kept at the sensory table for sweeping up messes. When I saw him get the broom and dust pan, I got the big broom to help him get pellets into his dust pan. He did not take the broom out of the dust pan, but tried to scoop up pellets from the floor with the broom still snapped into the dust pan. As you can imagine, that did not work well. That was true even though I helped him with the big broom. I then gave him the big dust pan and we were able to sweep up more pellets, but as he would attempt to empty the dust pan into the table, only a few pellets would make it into the table.
So why was he piling pellets on the floor? I did not fully understand why until I showed his mother the video. She knew right away what he was doing even though the video was only 7 seconds long. And she knew immediately what he would do next: go get a dust pan to pick up the pile. She said that ever since she can remember, her boy has wanted to clean up messes. Only then did all his actions and the total scenario make sense to me. I now have a deeper understanding and appreciation of this child in my classroom.
If I had tried to stop him as soon as I saw him piling pellets, I would have missed the opportunity for such a valuable insight. I was surprised at myself for allowing the child to pile pellets. I was even more surprised when I realised how intentional his actions were.
About Me

- Tom Bedard
- Early childhood education has been my life for over 40 years. I have taught all age groups from infants to 5-year-olds. I was a director for five years in the 1980s, but I returned to the classroom 22 years ago. My passion is watching the ways children explore and discover their world. In the classroom, everything starts with the reciprocal relationships between adults and children and between the children themselves. With that in mind, I plan and set up activities. But that is just the beginning. What actually happens is a flow that includes my efforts to invite, respond and support children's interface with those activities and with others in the room. Oh yeh, and along the way, the children change the activities to suit their own inventiveness and creativity. Now the processes become reciprocal with the children doing the inviting, responding and supporting. Young children are the best learners and teachers. I am truly fortunate to be a part of their journey.
Friday, November 25, 2011
Thursday, November 17, 2011
VERTICAL BOXES - A SPACIAL PALETTE
Last week I wrote about building an apparatus I called Vertical Boxes.

One of the beauties of this apparatus is the number of spaces it creates for the children to explore and create large and small motor operations within those spaces. In other words, it creates a spacial palette for motor and cognitive operations.
The first space to consider is the sensory table itself. With this apparatus, the table is a large, open space. Watch how seven toddlers use this space.
That was seven toddlers standing side-by-side busy scooping and pouring with no conflict. Near the end of the video, you can see one child pour pellets into the big hole. She seems pleased with her actions and swings the bowl and the cup as she lets out some happy sounds. She then moves around to the other side of the box to reach into the hole to retrieve an object. Remember, that is seven toddlers content to stand shoulder-to-shoulder exploring the medium in the space and accommodating to each other's presence in that space.
(If you watch the video again, you can see her actions set off actions by the two children closest to her. But that will have to be another post.)
On the apparatus itself, the first space to notice is the big hole on the side of the box facing the sensory table. In the short video below the child is pouring pellets into the big hole. If you watch carefully, though, you will see he is targeting his pour so the pellets go into a hole in a second box that is embedded in the big box. Watch.
Some children start by just pouring the pellets in the hole. As the children get to know the space, they become more intentional and start to direct where they want the pellets to go.
Another space on the apparatus is the space created by one hole in the side of the big box opposite the table.

And again, the space created by the other hole on that side of the box.

There is also the space created by the embedded box.

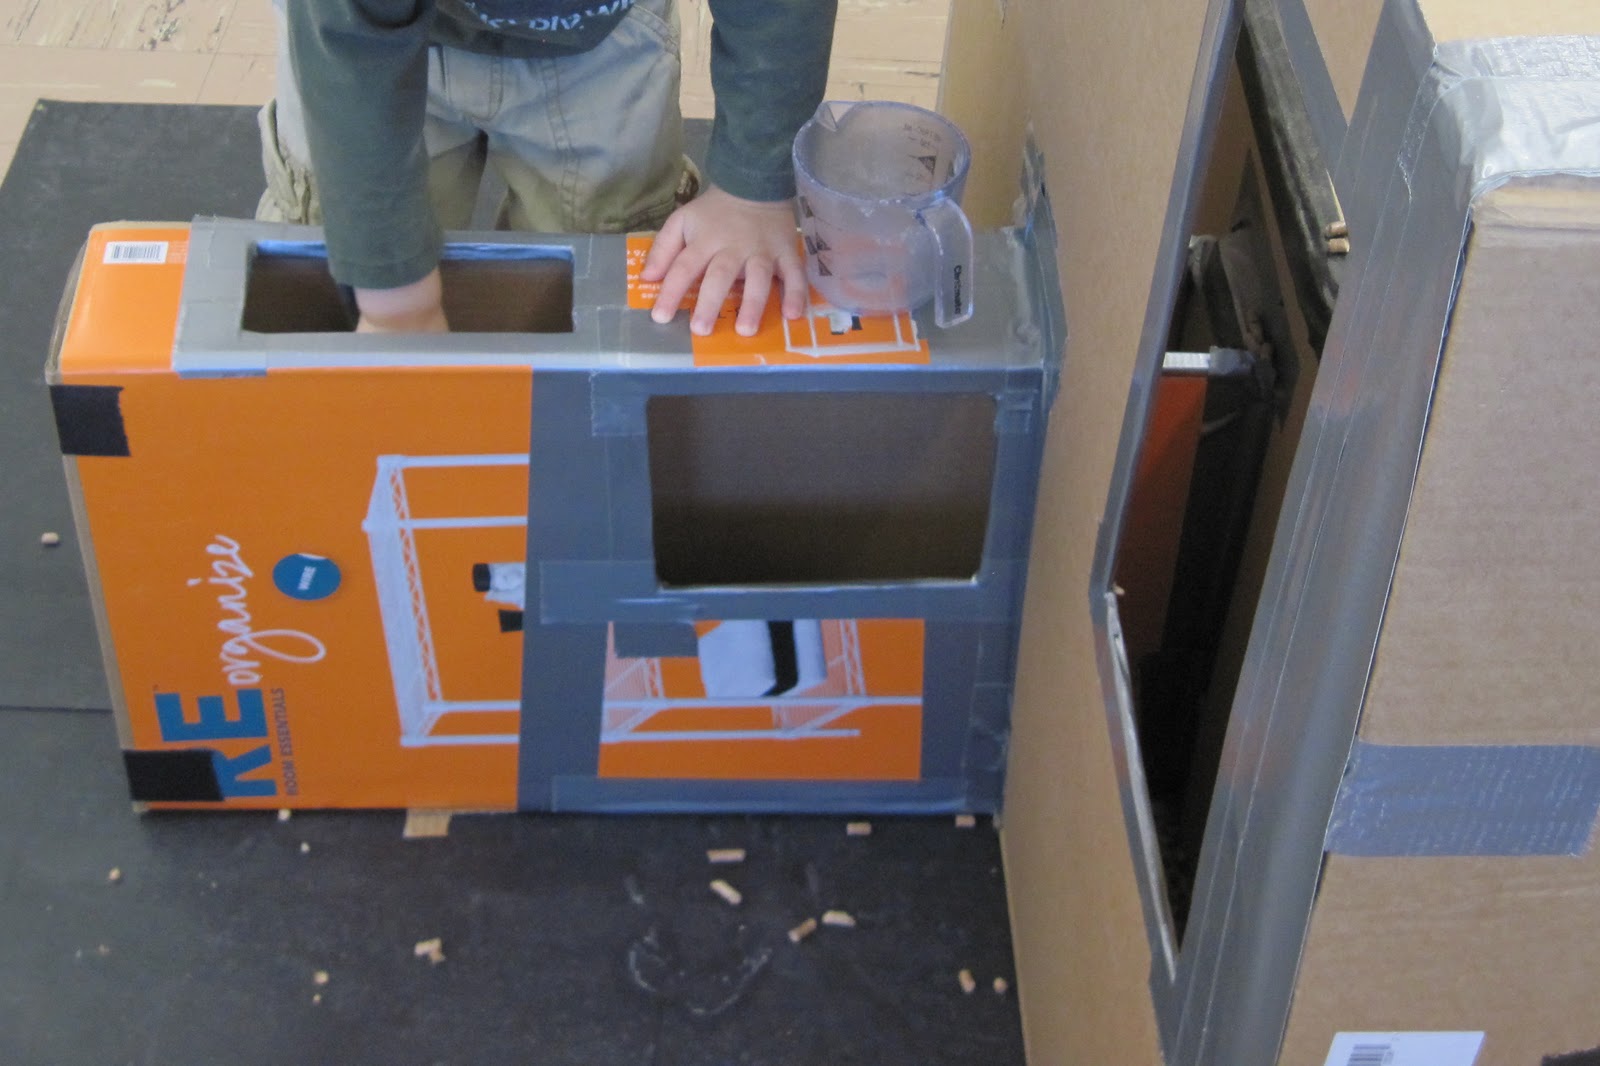
Did you notice that the space not only includes the holes of the box, but the top of the box, which provides another space on which to operate. The boy has set the measuring cup on the top of the orange box and is about to take the pellets he has just scooped from the hole and pour them into the cup
And if you use both the holes at the same time, you have an operation through spaces that even draws the interest of a friend.

Did you see that the boy is putting his hand through the top hole, scooping pellets in his cup, and then reaching through the lower hole to pour the pellets into the bucket? Why did he do that? Maybe he was just experimenting motorically or maybe he is has figured out that this operation is more efficient than pulling the cup back out the top hole. It is certainly a more interesting operation.
Finally, there is also the space created by the smaller, vertical box on the side.

What must it feel like for a child to operate in a tall, vertical space? The video below shows a boy operating in that space.
As you saw, this boy is scooping pellets from the bottom of the big narrow box. Note that the scoop is almost as wide as the box itself; that sets up an interesting challenge in itself. He first has to reach into the box all the way to the bottom. As he does this, he fits his head along with his shoulder so he can reach the pellets and see where he is scooping. He has to carefully lift the scoop up without spilling. That means he has to keep the scoop level. As he gets the scoop up to the height of the window, he has to turn it slightly so the scoop fits through the window. While he adjusts the scoop ever so slightly, he still has to keep from spilling the pellets as he pulls it through the window. He has already learned to operate in that narrow, vertical space to complete his task. That is some serious spacial literacy.
If you look at axiom #2 to the right and its corollary, you can see clearly with this apparatus that the multiple spaces lead to more exploration. Those spaces do two things. First, they present physical challenges for them to carry on their initial operations. Second, those spaces also offer children a spacial palette on which to create and expand their initial operations in those same spaces.

One of the beauties of this apparatus is the number of spaces it creates for the children to explore and create large and small motor operations within those spaces. In other words, it creates a spacial palette for motor and cognitive operations.
The first space to consider is the sensory table itself. With this apparatus, the table is a large, open space. Watch how seven toddlers use this space.
That was seven toddlers standing side-by-side busy scooping and pouring with no conflict. Near the end of the video, you can see one child pour pellets into the big hole. She seems pleased with her actions and swings the bowl and the cup as she lets out some happy sounds. She then moves around to the other side of the box to reach into the hole to retrieve an object. Remember, that is seven toddlers content to stand shoulder-to-shoulder exploring the medium in the space and accommodating to each other's presence in that space.
(If you watch the video again, you can see her actions set off actions by the two children closest to her. But that will have to be another post.)
On the apparatus itself, the first space to notice is the big hole on the side of the box facing the sensory table. In the short video below the child is pouring pellets into the big hole. If you watch carefully, though, you will see he is targeting his pour so the pellets go into a hole in a second box that is embedded in the big box. Watch.
Some children start by just pouring the pellets in the hole. As the children get to know the space, they become more intentional and start to direct where they want the pellets to go.
Another space on the apparatus is the space created by one hole in the side of the big box opposite the table.

And again, the space created by the other hole on that side of the box.

There is also the space created by the embedded box.

Did you notice that the space not only includes the holes of the box, but the top of the box, which provides another space on which to operate. The boy has set the measuring cup on the top of the orange box and is about to take the pellets he has just scooped from the hole and pour them into the cup
And if you use both the holes at the same time, you have an operation through spaces that even draws the interest of a friend.

Did you see that the boy is putting his hand through the top hole, scooping pellets in his cup, and then reaching through the lower hole to pour the pellets into the bucket? Why did he do that? Maybe he was just experimenting motorically or maybe he is has figured out that this operation is more efficient than pulling the cup back out the top hole. It is certainly a more interesting operation.
Finally, there is also the space created by the smaller, vertical box on the side.

What must it feel like for a child to operate in a tall, vertical space? The video below shows a boy operating in that space.
As you saw, this boy is scooping pellets from the bottom of the big narrow box. Note that the scoop is almost as wide as the box itself; that sets up an interesting challenge in itself. He first has to reach into the box all the way to the bottom. As he does this, he fits his head along with his shoulder so he can reach the pellets and see where he is scooping. He has to carefully lift the scoop up without spilling. That means he has to keep the scoop level. As he gets the scoop up to the height of the window, he has to turn it slightly so the scoop fits through the window. While he adjusts the scoop ever so slightly, he still has to keep from spilling the pellets as he pulls it through the window. He has already learned to operate in that narrow, vertical space to complete his task. That is some serious spacial literacy.
If you look at axiom #2 to the right and its corollary, you can see clearly with this apparatus that the multiple spaces lead to more exploration. Those spaces do two things. First, they present physical challenges for them to carry on their initial operations. Second, those spaces also offer children a spacial palette on which to create and expand their initial operations in those same spaces.
Thursday, November 10, 2011
VERTICAL BOXES
Last year I worked with an infant/toddler teacher who brought in a box that had height and width, but not much depth. As she was looking at placing it in her sensory table, we talked about orientations it could take. As we talked, she kept trying the different orientations. She settled on an orientation that was a vertical box next to the table. Here is what it looked like.

This teacher put objects---juice lids, clothes pins and cardboard shapes---in the sensory table for the children to put in the holes on both sides of the box. The objects would disappear and then come out the bottom on the side opposite the table. It was great play and exploration with toddlers using their fine and large motor skills to put things in holes. And there was always the wonderment of figuring out where those things went and the discovery of finding out they ended up at the bottom of the vertical box. Basically, it was a relatively flat, vertical plane that the children could operate on different levels.
I liked the orientation so much that I told myself if a similar box appeared, I would set up something with the same orientation. That box appeared a couple of weeks ago so I set it up on the side of the table. I also decided to add two other boxes with a similar orientation to form an apparatus I call Vertical Boxes.
I took the first big box which was tall and wide but was not deep and set it next to the table.

I cut a big hole in the side facing the table and taped the flap to the lip of the table.

On the opposite side, I embedded a second box.

Before I embedded the box, though, I cut a hole in the top that would be embedded in the bigger box so when children put the pellets into the big hole, some would go into the embedded box. After embedding, I cut two holes in the box, one on the side and one on the top.

I added a third box on one side of the table. This one I did not embed. Rather I cut a hole in the side on the bottom. That left me a flap. I then cut a matching hole in the big box and was able to tape the flap from the smaller box into the bigger box.

I then taped the smaller box to the bigger box on all sides. So the box below is connected to the bigger box by the hole in the bottom of the smaller box matching a hole in the bigger box. (If you can understand that, then you must be really good at putting things together from directions that come in packages. If you did not understand, no problem, just experiment with attaching boxing by embedding and not embedding.)

I cut holes in the big box on the side opposite the table.

The holes do not match up to the big hole on the other side. That allows a child on one side of the apparatus to pour into the hole on the table side without it spilling on the floor or interfering with the play of a child on the other side. Watch it in action.
If those holes had matched up, there would be pellets spilling all over the floor on the opposite side of the table.
If you can visualize the spaces these two are operating in, you would know that their heads at one point in the video are only separated by about the six inches---the depth of the large vertical box. Though their heads are close, they are operating on two different levels. The boy kneeling is basically operating on the floor. The other boy is scooping from the table into the large hole of the box. They might as well be playing totally separate spaces. But wait. What you may not be able to visualize is that the boy scooping the pellets from the table and pouring them in the larger box is supplying the child who is kneeling with more pellets. In other words, one child is operating on the pellets and wondering where are they going, while the other one is counting on a continual supply of pellets. So they are connected even though they do not know it. It doesn't show in this video, but at times the children figured that out. That, in turn, changes the nature of the play and the nature of the communication between children. Pretty interesting, no?
After a couple of days of play with the apparatus, I had to add a box---not vertical---under one of the holes in the orange box.

This doesn't fit with the theme of vertical boxes, but it does catch the pellets that were spilling out of the hole on the side of that orange box. Besides that, it also creates a place to put a bowl for the following activity. Watch and see what I mean.
As you see, We needed a little containment for "the bowl that wouldn't fill".
I originally took this video to document why I needed the new box. As I continued to watch it, I could not help but wonder what was going on. Did the child really know that the bowl was not full? Or was he telling me that he was not done filling the bowl? Those are two very different operations, both of which are valid. If he was filling the bowl, then he didn't understand the concept---or his understanding included the pile getting bigger as he added to the bowl. If he was not done filling the bowl, then he is wrapped up in the actions of scooping and pouring.
I vote for the second reason because for a child thinking and doing are one and the same.

This teacher put objects---juice lids, clothes pins and cardboard shapes---in the sensory table for the children to put in the holes on both sides of the box. The objects would disappear and then come out the bottom on the side opposite the table. It was great play and exploration with toddlers using their fine and large motor skills to put things in holes. And there was always the wonderment of figuring out where those things went and the discovery of finding out they ended up at the bottom of the vertical box. Basically, it was a relatively flat, vertical plane that the children could operate on different levels.
I liked the orientation so much that I told myself if a similar box appeared, I would set up something with the same orientation. That box appeared a couple of weeks ago so I set it up on the side of the table. I also decided to add two other boxes with a similar orientation to form an apparatus I call Vertical Boxes.
I took the first big box which was tall and wide but was not deep and set it next to the table.

I cut a big hole in the side facing the table and taped the flap to the lip of the table.

On the opposite side, I embedded a second box.

Before I embedded the box, though, I cut a hole in the top that would be embedded in the bigger box so when children put the pellets into the big hole, some would go into the embedded box. After embedding, I cut two holes in the box, one on the side and one on the top.
I added a third box on one side of the table. This one I did not embed. Rather I cut a hole in the side on the bottom. That left me a flap. I then cut a matching hole in the big box and was able to tape the flap from the smaller box into the bigger box.

I then taped the smaller box to the bigger box on all sides. So the box below is connected to the bigger box by the hole in the bottom of the smaller box matching a hole in the bigger box. (If you can understand that, then you must be really good at putting things together from directions that come in packages. If you did not understand, no problem, just experiment with attaching boxing by embedding and not embedding.)

I cut holes in the big box on the side opposite the table.

The holes do not match up to the big hole on the other side. That allows a child on one side of the apparatus to pour into the hole on the table side without it spilling on the floor or interfering with the play of a child on the other side. Watch it in action.
If those holes had matched up, there would be pellets spilling all over the floor on the opposite side of the table.
If you can visualize the spaces these two are operating in, you would know that their heads at one point in the video are only separated by about the six inches---the depth of the large vertical box. Though their heads are close, they are operating on two different levels. The boy kneeling is basically operating on the floor. The other boy is scooping from the table into the large hole of the box. They might as well be playing totally separate spaces. But wait. What you may not be able to visualize is that the boy scooping the pellets from the table and pouring them in the larger box is supplying the child who is kneeling with more pellets. In other words, one child is operating on the pellets and wondering where are they going, while the other one is counting on a continual supply of pellets. So they are connected even though they do not know it. It doesn't show in this video, but at times the children figured that out. That, in turn, changes the nature of the play and the nature of the communication between children. Pretty interesting, no?
After a couple of days of play with the apparatus, I had to add a box---not vertical---under one of the holes in the orange box.

This doesn't fit with the theme of vertical boxes, but it does catch the pellets that were spilling out of the hole on the side of that orange box. Besides that, it also creates a place to put a bowl for the following activity. Watch and see what I mean.
As you see, We needed a little containment for "the bowl that wouldn't fill".
I originally took this video to document why I needed the new box. As I continued to watch it, I could not help but wonder what was going on. Did the child really know that the bowl was not full? Or was he telling me that he was not done filling the bowl? Those are two very different operations, both of which are valid. If he was filling the bowl, then he didn't understand the concept---or his understanding included the pile getting bigger as he added to the bowl. If he was not done filling the bowl, then he is wrapped up in the actions of scooping and pouring.
I vote for the second reason because for a child thinking and doing are one and the same.
Thursday, November 3, 2011
TAKING MY OWN ADVICE
In my very first post when I started this blog in July, 2010, I wrote about the space for the sensory table in my classroom. I said the table was enclosed on three sides. See below.

There is a cabinet on the right, a wall in the back, and a sink and counter on the left. The reason the sensory table was enclosed was to help contain the mess that accompanies most play at the sensory table.
The space was not big; it was 8' X 6.5'. Even though that was not big a big space, it still accommodated plenty of children.

In September, we moved into a new space. The classroom is twice the size of the old one. When I went to set up the sensory table in the new classroom, I did not take my own advice. See below.

The space is larger; the mats under the table mark off an area of 12' x 6'. If you notice, though, the space is not enclosed. Only one side, the side facing the wall, is a closed side. The right side is slightly enclosed, but not by much. There is a cabinet, but it is a small barrier.

Here's what happens when the sensory table is not enclosed.

All the spaces around the table become part of the sensory play. Children actually brought the pellets out onto the open linoleum floor and played with them there.
I am very tolerant of messes, but this was too much for even me. As I looked around the room, I needed to find a more enclosed space for the sensory table. I settled on a space on the opposite wall.

In the new space, the table is enclosed. There is a counter on the right, a wall in back and cabinets on the left. There is also a table in the foreground which also helps contain the play and exploration at the table.
Is there a difference? As we say in Minnesota, "You betcha."
So why didn't I start out with this configuration? I set up the room to be functional at the start of school year. As the children interacted with the spaces, I watched and evaluated how the spaces were being used. From my observations of how the children used the spaces, I made changes. I have moved four of six main areas just after six weeks of school. I am still not completely satisfied, but it will be an ongoing process of evaluating how the children use the spaces. Since taking my own advice about enclosing the sensory table, though, I think I will keep the sand and water table in its current space. After all, what good is my own advice if I don't even follow it?
Subscribe to:
Posts (Atom)